Chocolate and chilli loaf..

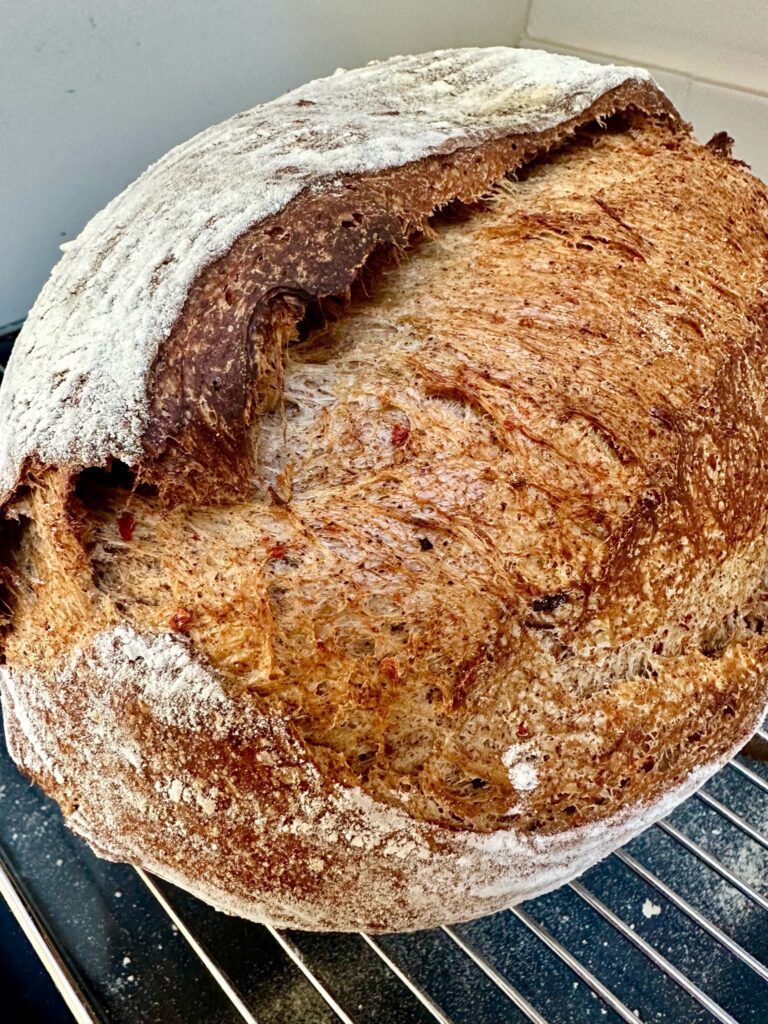
Let me tell you the story of this huge and beautiful loaf…

For this dough I used my ‘same day’ process as I planned to make and bake the dough within the same day. That meant I used 100g starter instead of my usual 50g, (see ingredients details below) and I mixed the dough up mid morning. I left it in my kitchen to do it’s thing, when really I should have put it in a warm space as per my same day process in my books, but I didn’t, I left it on the counter.

As it was cold, as the day went on the dough didn’t really do much, so I took a risk and left it out all night in addition to the time it had on the counter all day. It was so cold I decided it was worth a go…and luckily, it worked! This is what I woke up to…

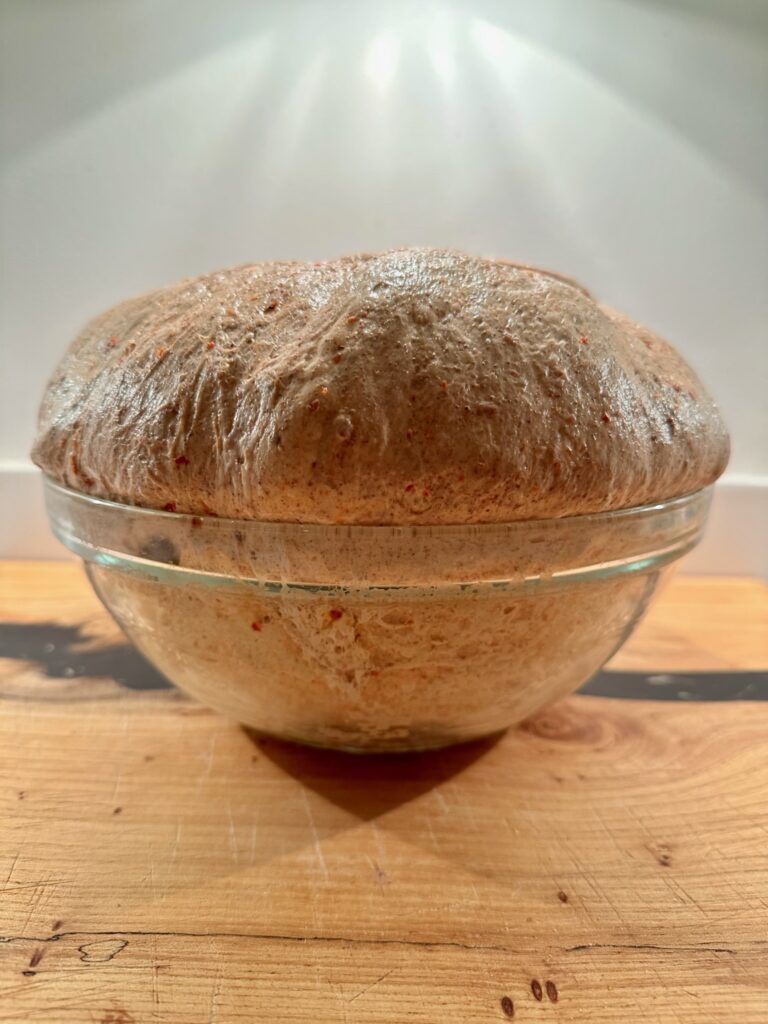
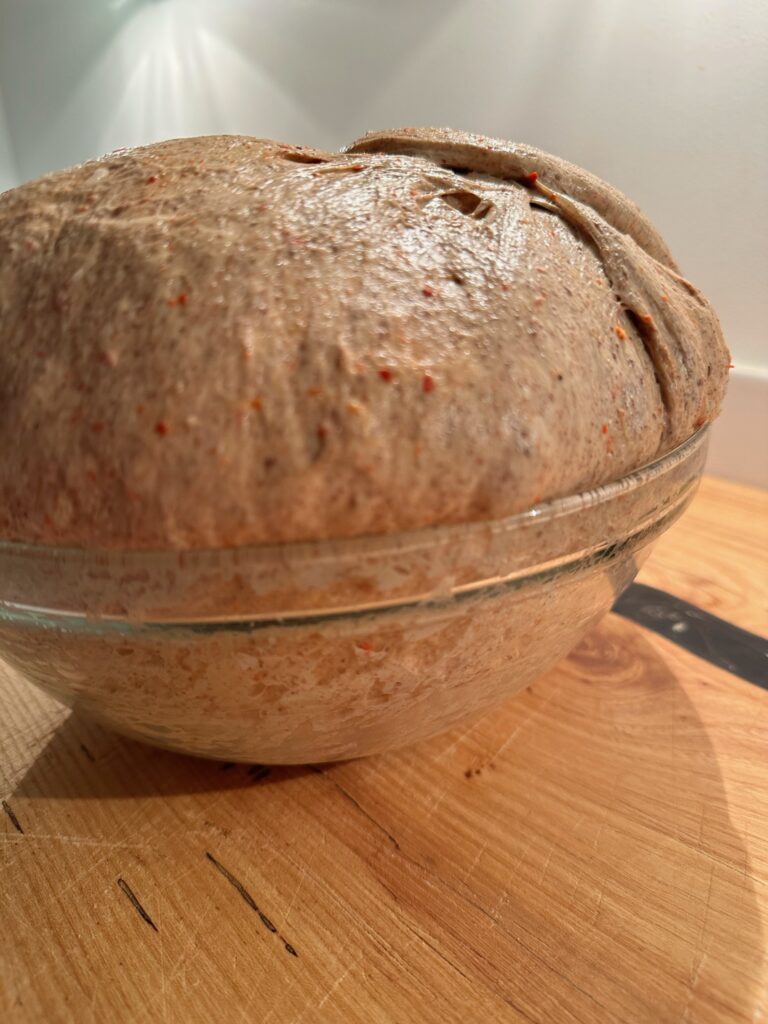
A HUGE beautiful dough! And a beautifully structured dough too.

Due to the cold weather this dough had proved for around 18 hours in total and remained perfectly intact and ready to bake into a great loaf. The chilli give it a nice hit of heat and the chocolate adds a richness and brings out the chilli flavour nicely.

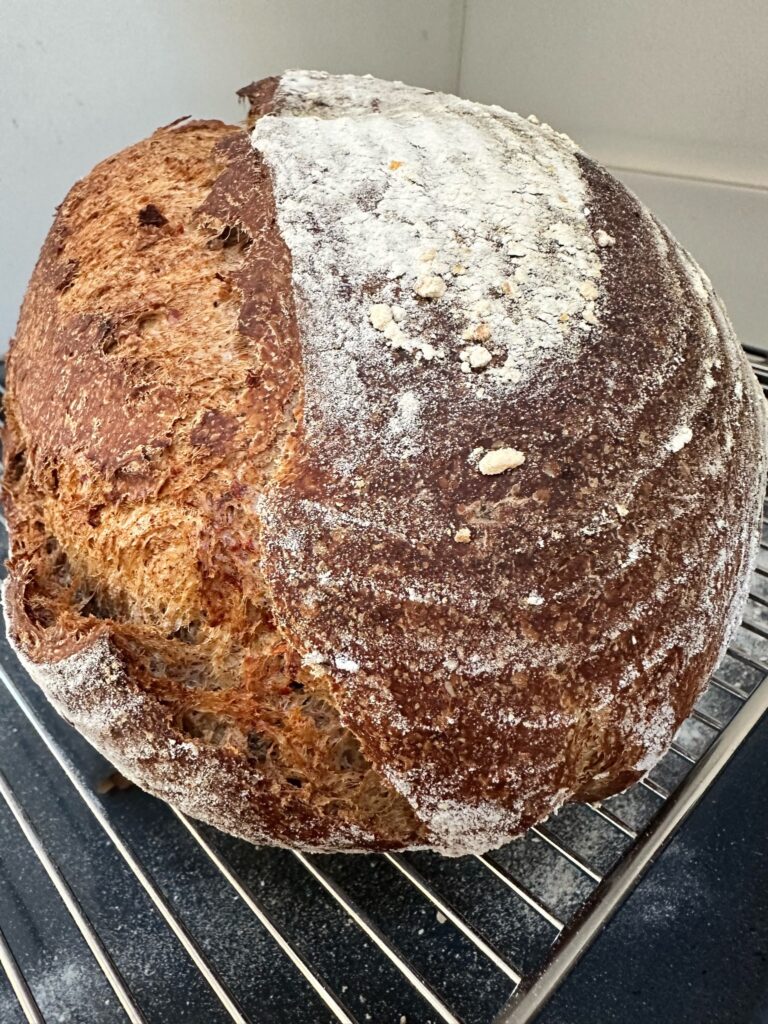
NOTE: Below are the ingredients I used, the mixture of the sugars in the chocolate and the oat milk, the added starter and the chilli all added to produce this beautiful dough which baked into such a big loaf it hit the top of my pan, as you can see by the slight dip in the top of the loaf in the first photo.

I wouldn’t necessarily recommend using this much starter typically unless you can watch the dough or manage the time and temperature. If I make this again I will use my usual 50g starter and my usual timings.

Ingredients

100g starter/50g starter

350g oat milk/400g oat milk (or milk of your choice)

500g strong white bread flour

50g grated/flakes 80% dark chocolate (use your own choice of chocolate)

30g pul biber/Aleppo chilli flakes (these are quite mild, and gives the loaf a nice heat, if you want more of a kick, use a stronger ground chilli powder/chilli flakes)

Salt to taste

Method

Follow my master recipe or use the same day process in either of my books.

Enjoy!

To answer the questions that came up when I shared this dough: this dough is not over proved. If it was over it would have collapsed and been bubbly and hard to handle; this was a perfectly proved well structured dough.

Spiced spinach sesame seed sourdough flatbreads…

My flatbreads served with a plate full of leftover roast vegetables, ajvar, zaatar and tahini

I do like a ‘chuck it all in a bowl and see what happens’ kind of creation, which is what these were…I’ve made many spinach flatbreads in the past, but this was the first time adding some starter. It adds an extra flavour and of course, all that sourdough goodness we love!

These are also packed with great healthy ingredients and are a great way to get kids eating spinach! You can use them as flatbreads or make bigger rounds and use them as a pizza base.

Equally great the next day, the flavours continued to develop

This recipe can serve as a basis for something you might fancy making, you can swap out the ingredients for things of your choice or just follow it as it is. I’ve included the spices I used, feel free to swap these for your favourites, an Indian inspired spice mix works well too.

Ingredients

200g starter (this can be discarded starter, unfed, or fed for the purpose)

250g baby spinach leaves

150g flour of your choice, I used buckwheat flour

50g toasted sesame seeds

3 tablespoons tahini or olive oil

3 garlic cloves, peeled

2 teaspoons tabil spice mix (toasted even amounts of coriander, cumin and carraway seeds, ground)

2 teaspoons pul biber chilli flakes

2 teaspoons paprika

Salt and pepper to taste

All in the bowl

Method

In a blender whizz up the everything expect the sesame seeds, starter and flour. Run it until the spinach and garlic are finally chopped.

Scoop it all into a mixing bowl, stir in the seeds, then fold in the starter and flour.

Cover the bowl and leave the dough to settle and develop.

Now you can leave the dough for an hour, or several or overnight. The longer you leave it the more the flavour will develop, it may even prove and little and puff up.

When you want to cook your flatbreads, heat your oven to 180C fan/200C non fan.

Turn the dough out onto a floured surface and break off portions. Shape them into round then flatten them out to 1/2cm thick.

Place them onto a oven tray. Either bake immediately or cover and allow them to prove again for an hour before baking.

The uncooked dough is such a great colour and smells amazing

Bake for 10-15 minutes until slightly puffed and darker in colour.

Eat warm or store for later, they’re even better after 2-3 days, and can easily be reheated in a toaster.

Enjoy!

I hope you like them!

Goats cheese and pesto sourdough waffles

A close up of some waffles on a plate

Let me introduce you to my most recent creation….it all began when I bought a waffle maker recently, possibly a huge mistake for my waistline, but so much fun to play with!

Making waffles with starter adds the lovely flavour we all adore, as well as a great texture.

A close up of some waffles on a plate
A close up of a waffle in the middle of it

I’m a savoury eater, so you could convert this easily for a sweet option but let me assure you that these are worth trying.

I used just starter, egg, goats cheese and some tomato pesto. It’s great way to use discard if you’re making a new starter, or using up some if you’ve been building up too much, or feed up your starter for the purpose then portion out what you need for the recipe.

You could also use less starter and top up the rest of the mixture with flour and water. Personally I prefer them made with all starter for the flavour.

A close up of some waffles on a plate

Ingredients

Makes 1 round/4 quarters (double the quantities for 2 rounds)

200g starter (discard, unfed, fed and active and stirred down)

OR 100g starter, as above, plus 50g flour of your choice & 50g water

1 large egg

50g crumbly goats cheese (or cheese of your choice)

25g pesto of your choice (or harissa, chilli sauce, whatever you fancy)

Method

Heat your waffle maker to maximum.

Stir all of the ingredients together well, but don’t break up the goats cheese too much. Let it sit for 10 minutes to thicken.

Once the waffle maker is ready, pour all of the mixture in (it all fitted perfectly in mine, assess how much yours needs from your own experience), close the maker and cook for 10-15 minutes or until there’s no more steam coming from your maker.

Carefully ease the cooked waffles from the maker, cut into quarters and serve.

A close up of some waffles on a plate

Tuck in as soon as cool enough to hold!

If you don’t have a waffle maker, maybe add a little extra flour and try these as pancakes or flatbreads?

My waffle maker is made by Netta and I ordered it on amazon.

A guide to making sourdough pancakes…

A close up of some food on the pan

Making pancakes with sourdough starter is simple, fast and oh so satisfying! It’s also a perfect way to use up discard if you are making a new starter, or using up some if you’ve found that you’ve started keeping too much starter.

A close up of some food on the table
A pizza with cheese and sauce on top of it.

Alternatively, feed your starter for the purpose. Build it up so that you have 100-200g of starter then mix it with milk of your choice, and an egg or egg replacement, and, if you feel the batter needs it, extra flour. Whisk it all up together.

*If you are feeding your starter solely for making pancakes, just feed it more than normal to create what you need. If you’re using discard it doesn’t need feeding or any additional attention, just use it as it is.

*As a guide, I whisk 150-200g starter with 1 egg and then enough milk to make the batter I want, depending on whether I’m making crepes or scotch/American pancakes. Thinner for crepes, thicker for the smaller thicker pancakes.

*You can use any type of starter and any type of flour to make your pancakes, I use whatever takes my fancy, hence the different colours of mine shown here.

*Make the batter as thin or thick as you usually would for pancakes.

*Let it sit until you’re ready to use it, or use immediately. If you’re going to let it sit, maybe for 1-2 hours, it will ferment a little and develop some more flavour, just cover the bowl until you’re ready to use it. It can sit at room temp. I usually use mine immediately.

*Heat a large pan over a medium heat and melt some butter in the pan. Spoon in a ladle full of batter and cook until ready, turning halfway once the base has browned.

*Eat the pancakes with your choice of sweet or savoury fillings.

A close up of some food on the pan
A process of making pizza with different toppings.
I used 2 of my sourdough pancakes to make quesadillas, I filled 2 with a homemade chilli sauce and grated cheese and melted them together
A plate of food that is on the table.
Tasty sourdough quesadillas

My sourdough spelt banana bread…

Introducing my sourdough banana spelt bread…I used white spelt flour in this loaf, feel free to substitute it for any flour/s of your choice. I’ve used all and any flour to make this recipe, it works whatever you choose to use. Try it with a mix of white and wholewheat/wholegrain spelt flours, a portion of rye flour, any ancient grain flours, they all work.

The starter adds flavour and texture but not lift in this recipe as it is an immediate recipe. It’s great freshly baked but also good later and the next day once the flavours have developed.

As is my choice, I used a small amount of honey in my loaf. If you would prefer something sweeter please feel free to double it or replace it with 100-150g of your choice of sugar. You could also add chopped nuts, chocolate chips, raisins, whatever you fancy.

Ingredients

200g white spelt flour (I use this one)

100g bubbly active starter

50g runny honey

50g softened butter

1tsp bicarbonate of soda

1/2tsp baking powder

1 egg

3 medium/2 large ripe bananas, roughly mashed

An extra banana if you want one for decoration, sliced

Method

Either grease or line a 2lb/900g, 23 x 13cm/9″ x 5″ loaf tin

Mix all of the ingredients together well, but not over mixed, spoon the mixture into the loaf tin.

Place into your cold oven, turn it up to 160C/320F fan/convection, 180C/360F non fan/convention and bake for 50-60 minutes or until a metal skewer comes out clean.

Eat!

My sourdough cheese soufflés….

A close up of some baked dessert in white dishes

This idea has been floating round my brain for a while now and this week I finally tested it out and this was the outcome….beautiful airy cheese soufflés, rich from the eggs and with the flavour of cheese, but with the added tang of sourdough. SOOOOOO a good! Tasty, light, textured, perfect morsels. For me, a total winner!

As this was pure experiment – let me clarify, I have never ever made any form of soufflé, sourdough or otherwise before this – I only made a small amount of batter so feel free to increase it. This made 4 small soufflés, in 8cm (internal) diameter pots.

The idea came from thinking about the light bubbly airy nature of sourdough starter mixed with the light airy nature of a soufflé. In my mind it made perfect sense! And luckily the result was fabulous, even if I say so myself! I immediately ate 3 just to be totally sure 😆😆😆😆

A small bowl of food on top of a table.

Small but perfectly formed and so very tasty!!!!!

It was so exciting to watch them cook as they grew very quickly, and very well! I was dancing round my kitchen in excitement.

A close up of some food in bowls

I am so happy with the outcome, I hope you love them too if you try them. I know they could have risen more evenly, I know they’re not ‘perfect’ in the world of soufflés, but I don’t care! It worked and they taste so good, to me they’re perfectly beautiful sourdough cheese soufflé babies!

Here’s what I did…

Ingredients

100g bubbly active starter

100g whole/full fat milk

100g grated medium/mature cheddar (depending just how much you love cheese!)

2 eggs, separated into yolks and whites

Butter to grease the pots

Ground almonds, 4 tablespoons (use finely grated Parmesan or breadcrumbs for a different finish)

A bowl of food on top of a blue plate.

Method

Preheat the oven to 180C/360F fan assisted/convection or 200C/390F non fan/non convection, and place an oven tray inside to preheat.

Grease your ramekins, or small ceramic pots, with butter, then sprinkle ground almonds/almond flour into each pot and tap it around to create a layer inside each pot, covering the base and up the sides.

In a medium bowl, make the batter by adding the starter, milk, egg yolks and cheese. Stir it all together well.

In another clean bowl, whisk the eggs whites until they just hold their peaks.

Gently scrape the whisked egg whites into the batter.

Using a metal spoon, gently fold the eggs whites into the batter, using a figure 8 action, or cutting and stirring round the bowl. Do this carefully to mix them in whilst protecting the air that you’ve whisked into the whites. Do not over mix. This is crucial.

Gently spoon the batter into the prepared bowls filling them evenly and to the top of the pots if possible.

‘Top hat’ each one by running a cutlery knife, or clean finger nail, around the edge of each pot, just the very tip of the knife, so that the mixture doesn’t stick. (I didn’t do this very well hence the uneven growths!)

Place the pots onto the preheated tray in the oven.

After 15 minutes turn the oven down to 160C/320F fan assisted/convection or 180C/360F non fan/non convection, and bake for another 15 minutes.

DO NOT OPEN THE OVEN UNTIL FULLY BAKED. If you do they will collapse.

Serve immediately.

They may start to collapse quickly but it’s all part of the fun!

A bowl of food with two pieces of bread on top.

Voila! My new creation! Welcome to the world sourdough cheese soufflés!

I am sharing my soufflés with everyone at the weekly Fiesta Friday link party this week – join in the fun!

Leftovers loaves…

A close up of some food on foil

You know how it is, you open your baking cupboard and you’ve got various bags of flour, with various amounts left, but not enough for an entire dough…

A loaf of bread with some type of cheese on it

So the only thing to do is to throw them all together and hope for the best?! That’s what I did this week. And these loaves were the outcome..

A loaf of bread in a bowl on wax paper.

A loaf of bread in a bowl with some potato chips.

These include portions of strong white bread flour, malted multigrain flour, khorasan flour and a seeded flour mix, all thrown together in various quantities to make up my normal 500g amount of flour for my master recipe.

A loaf of bread with many different toppings.

A loaf of bread with many different types of food.

As you can imagine, I was happy with the outcome!

A piece of bread is on top of foil.

A close up of some food on foil

I love seeing how the activity in Star and then the dough after it’s overnight prove translates into the dough…it never ever gets boring!

Happy Baking!

The story of this week’s course…

A blue plate topped with cookies covered in nuts.

This week I had a lovely lady in my kitchen who had travelled especially from Dubai, in the United Arab Emirates. It’s such a compliment that she wanted to come and share my kitchen, and that she follows my baking from so far away.

It was also very close to my heart to welcome her to my home; I lived in Dubai as a child and I have a long connection with the UAE having had parents living Dubai and then Abu Dhabi across 30 years, as well as living there myself full time for 5 years prior to that. It is a place that holds a special piece of my heart and formed many of my food tastes as well as creative influences.

It was a joy to talk to someone who remembers the Dubai that I remember from the 1980’s and to listen to her speak Arabic is a sound I always love!

A close up of some bread on a plate

During the course we focussed on the basics of my master recipe and process, as well as working with wholemeal flour and using doughs for making rolls and other lovely sourdough goodies.

I always make sure that there is lots of dough to play with on my courses to get the feel of how different flours affect the dough but also to be able to turn dough out to make rolls in various guises, including the ones in the photos in this post.

A close up of some food on a plate

There were all made with my master recipe dough, one portion of which included 150g of khorasan/kamut flour (hence the yellow tint), and another made up of 250g Mrs Middletons plain natural flour + 250g Mathews Cotswolds white spelt flour.

We chopped up the dough and roll some portions in toasted seeds (above), and some in some Middle Eastern zaatar spice mix (below), and left some naked.

A close up of an avocado on a plate

You will find the details for making my various rolls recipes in my recipe index and all of the doughs were made using my master recipe.

I do love running my courses, I meet such lovely people, and it’s always an honour to welcome sourdough bakers from around the country and the world to my kitchen xx

My master recipe sourdough pizza…

A close up of some pizza slices on a plate

This recipe uses the dough created using my master recipe process and then using it to create the pizza of your choice; the dough can be made up of the flour/s of your choice to create different flavours & textures…

A piece of pizza is being cut into slices.

The outcome being a lovely textured, holey, tasty pizza base!

The key is how to manage and store the overnight dough ready for when you want your pizzas. I have got 2 methods below, each designed to make it simple to fit the dough in with your timings, and not the other way round!

A close up of the crust on a pizza.

Method 1.

The morning after the overnight prove, you will hopefully have a lovely big bowl of bubbly dough; if it is escaping the bowl, gently do a single set of pulls and folds, just go once round the bowl, to pull it loosely together, re-cover it, and place it in the fridge. If the dough hasn’t reached the top of the bowl already, just place it in the fridge to bring the activity to a halt until you want to use it.

When you know when you want your pizzas to be ready for, remove the dough from the fridge an hour or so beforehand and let it warm up a bit.

Cover your work surface with water, flour or olive oil, I use water.

Turn the dough out from the bowl onto your surface and cut into portions, 2, 4 or 6, depending how big you would like your pizzas to be.

Let it sit for 10 minutes.

**I use a foil lined baking tray to cook my pizzas, liberally drizzled with olive oil (I like the crust it generates when baked). However, you may prefer using semolina, polenta/corn meal, flour, whatever your choice under the dough, directly onto your baking tray or baking implement of your choice. If you’re using a pizza stone, prepare the dough on a board or tray ready to be able to move it across to your stone as you usually do.

After 10 minutes place the dough on your chosen bakeware, and start to gently use your finger tips to push the dough out into a thinner rounder shape, or shape of your choice. You will need to let it sit for a few minutes and then do it again as the dough will bounce back.

Preheat the oven to 220C fan/240 non fan/460F.

Give your dough one final push out, spread with sauce of your choice and toppings of your choice, and bake for 12-15 minutes until the base is cooked and the cheese is bubbling.

Enjoy!

A collage of four different pictures with food.

Method 2.

In the morning you will hopefully have a lovely big bowl of dough. Cover your work surface in flour, water or oil, and turn the dough out onto the surface. I use water at this point.

Prepare your baking tray, I drizzle olive oil over my foil lined tray as stated above.

Portion the dough into 2, 4 or 6 pieces.

Let it sit for 10 minutes.

Place the pieces onto your prepared baking tray and use your fingers tips to push it gently out into a round; it will want to bounce back so let it set for a while and do it again.

Once you’ve got it pushed out to the thinness and size that you want, cover the whole tray with a large plastic bag, or place cling film over the dough, and put the whole tray in the fridge.

It can now sit in there until you want to use it, I’ve let mine sit in the fridge all day in the past.

**The top 2 photos in the collage below show the dough before and after being in the fridge. As you can see, the dough continued to work in the cold – my SuperStar in action!

You can now use this dough directly from the fridge, you don’t need to let it warm up or come to room temperature, you can just add your toppings and bake.

If you’re more comfortable letting it come to room temperature before baking you can do that too.

Preheat the oven to 220C fan/240 non fan/460F, and bake for 12-15 minutes until the base is cooked and the cheese is bubbling.

Four different pictures of pizza dough and cheese.

Enjoy!

A close up of some pizza slices on a plateA close up of some pizza on top of a blue surface

Beautiful blistered base, and it tastes SOOOO good!

A piece of pizza is being cut into slices.

And a view of the cooked base…

A close up of some kind of food

I love the crust that the olive oil creates, added to the soft interior.

A pizza sitting on top of a blue plate.A close up of some pizza on top of a blue surface

I hope you like my method and find it useful, and user & life friendly. For more pizza recipes and more, check out my book, The Sourdough Whisperer.

My master recipe focaccia..

A close up of some food on top of a table

This lovely vision was created by using my master recipe process and converting it to make focaccia; by using my recipe and process all the way through to the morning after the overnight prove, you can then use the dough to create this lovely bread.

NOTE: if your dough has proved overnight and is reaching the top of the bowl or hitting the shower cap by the early morning but you’re not ready to use it yet, gently do one round of pulls and folds to calm it down a bit, then cover it again to allow it to grow and fill the bowl again over the next 2-3 hours for when you want to use it.

A close up of a pizza with some type of herbs on it

For this focaccia, I scaled down the quantities of my usual recipe, but you can keep them exactly as they are to make a bigger loaf than mine, or use the quantities below to make a smaller version.

Ingredients

300g strong white bread flour

210g water

30g bubbly active starter

1/2tsp salt or to taste

Additions: rosemary, garlic, or whatever you fancy!

Method

*The details for my master recipe and process are in links to the left of your screen.

Following the process up to the morning after the overnight prove, prepare a large baking tray by liberally drizzling it with a good amount of olive oil.

Using a bowl scraper or your hands, gently ease the bubbly risen dough from the bowl and let is fall onto the tray; it will pretty much plop onto the tray, which is fine, just take care not to handle it roughly or press out any of the lovely bubbles.

Gently turn the dough over so that it is all covered in olive oil and cover loosely with a large plastic bag or cling film and leave it on the counter to prove again for 1.5 – 2 hours.

Heat your oven to 200C fan (220C non fan).

Using your fingertips, push the dough out to a rectangular/oval shape until it’s about 1″/2-3cm thick. Use your finger tips to firmly press dimples all over the dough.

Sprinkle or place whatever toppings you choose over the dough; here I’ve used dried rosemary and sliced garlic (not too thinly sliced).

Bake for 17-18 until browned, or longer if you’re using a bigger dough at the start. If like me your oven has a hot spot, turn the tray round half way through.

A pizza sitting on top of foil covered in cheese.A square pizza with olives and herbs on it.

Ease off the tray and place on a rack to cool. Resist the temptation to cut into it whilst it’s piping hot.

Cut when ready to consume and enjoy!

For more detailed focaccia recipes, check out my books: find focaccia made with added wholegrain flours in this book, or my master focaccia recipe and focaccia pizza recipe in this book.

A close up of some food on a wooden boardA close up of some food on a plate

This makes a lovely holey light focaccia with a nice crunchy base.

A pile of food sitting on top of a wooden cutting board.