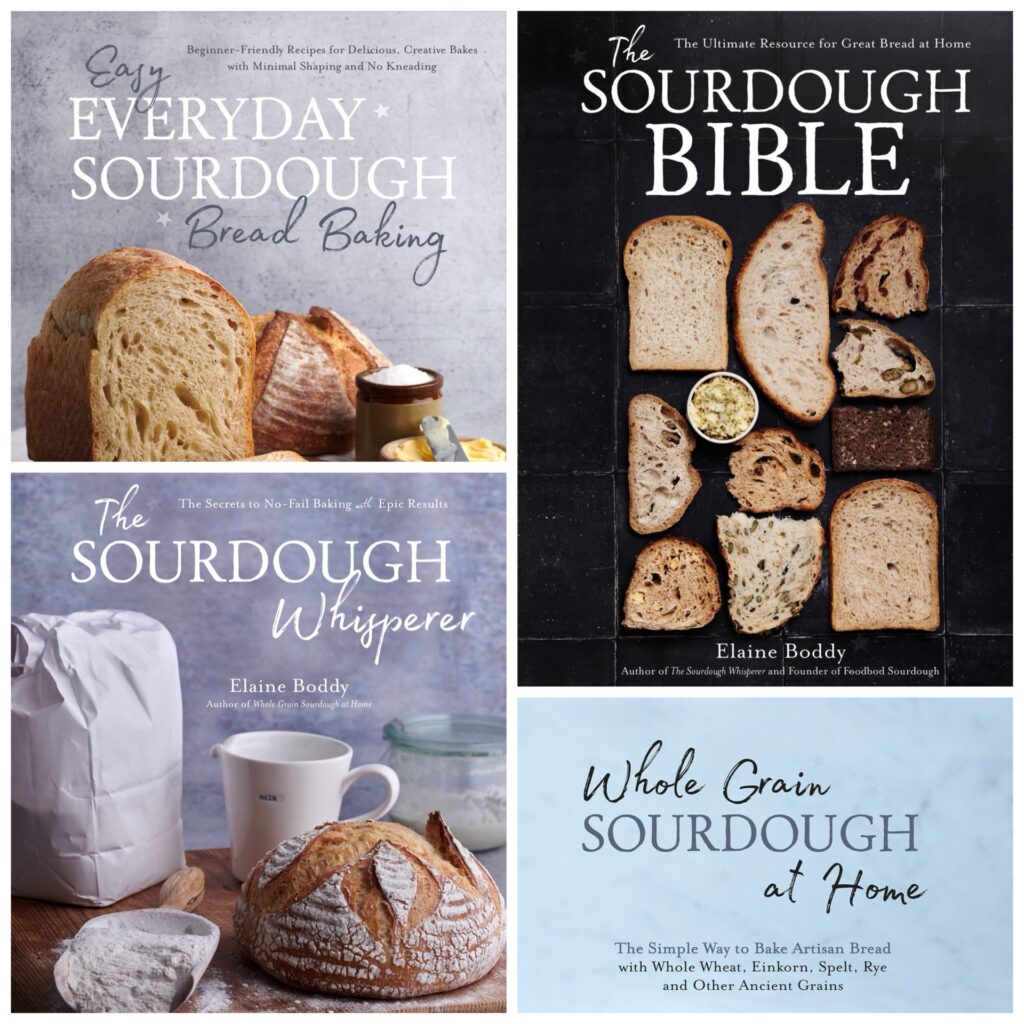
My books

I am so proud to have published 3 books, they are my babies, and share every bit of my sourdough love within the pages. I am often asked ‘What is the difference between your books?’ So if you are wondering that, I thought I’d endeavour to provide the answers…

All of my books are good for anyone starting out with sourdough, but they are also equally good for anyone who already makes sourdough as both have lots of different recipes and ideas.

If you are new to sourdough, or would like to know the simplest way to make sourdough, or to know all the answers to all the questions you’ve ever had, and more, THIS book is for you:

This was my second book and is the perfect handbook for understanding everything you need to know about making sourdough, simply and successfully.

I explain how to make a starter, and I go into a lot of detail about managing and using your starters. I spent a lot of time testing ideas, timescales and experimenting with my starters, pushing the boundaries of how to use them to be able to share different timetables and give you full confidence in using your starter.

This book includes my master recipe and full step by step detail with lots of information and tips to help bakers, with answers to frequently asked questions, lots of timetables and timing options, and as much of information from my sourdough brain as I could download onto the page.

You will also find a chapter all about dough. Making, proving, reading, understanding and using your dough. It focuses on the freedom and confidence to know that the dough does not need to control you but that you are fully in control of the DOUGH, and how it to make that happen.

The book then goes on to talk about timing, and temperature, how they affect your sourdough making, how you can manage them, and even more simple tips for your success.

This book answers every question you’ve ever had about sourdough, plus many you didn’t even think you had. It is a one stop shop for sourdough making.

The recipes that follow are full of flavours, and shapes, and different timings. The recipes, all different from the first book, include full size loaves, baby loaves, enriched doughs, spices, fillings, same day recipes, focaccia, pizza, rolls, ciabatta, and more.

If you fancy making lots of different breads with your starter and having lots of fun with sourdough, you’ll love this one:

My third and latest book is my absolute most creative collection of recipes yet, I had great fun making and testing all of these, and really hope that you will like them as much as I do. For me, this is the perfect partner to my book above, it’s a great next step to expanding your sourdough baking.

There are 60 different recipes in the book, sweet and savoury, including free form loaves, sandwich loaves, enriched doughs, rolls, baguettes, Turkish pide, pizza rolls, apple roses, filled loaves, seeded breads, baby loaves, cheesy rolls, crackers, flatbreads, pizzas, focaccia….it goes on and on, there’s so much choice! It includes a whole new wealth of flavours, shapes and sourdough possibilities within the pages. All of the recipes have been designed using my trademark methods and simplicity. I have also worked hard to take out any challenging shaping and I have maximised the use of the pots and pans and oven trays that we all already own to ensure that we get the most out of them possible – you’ll find some great new ways to use your bread pans!

This book is about fun and diversity and getting as much as possible out of your starter.

If you fancy trying some different flours, including whole grains and ancient grain flours, you’ll like this one:

A book cover with a picture of bread on it.

This was my first book and it also introduces sourdough and includes full details about what a starter is, and how to make one; it then goes into detail about wholegrain/wholemeal flours and ancient grains and heritage flours (spelt, emmer, einkorn, khorasan, rye), what they are, how they differ and how they behave in starters.

It then introduces my master recipe with lots of detail and answers all the questions you may have as you make sourdough. The book also discusses how the different flours will behave in doughs.

The recipes that follow include all of these flours too, in varying quantities, with tips about how the doughs will feel and behave, adding extras into doughs and handling doughs differently to make other things. They include full sized loaves, baby loaves, rolls, sandwich loaves, coil filled rolls, focaccia, same day recipes and crackers.

All of my books compliment one another, and also work perfectly as stand alone books. Bakers do not need to have them all – unless they want to of course…I hope this helps, if you have any further questions, please do contact me xx

What other people say:

“Each of your books simply whets my appetite for more –

Book 1 gave me the courage to start my sourdough journey,

Book 2 encouraged me to become more creative with my sourdough bakes and

Book 3 is a whole new world of devine recipes that I honestly cannot wait to try out!!

All three books include your principles for making sourdough easy & enjoyable plus tips & good housekeeping advice yet each book is very different in its own right and is worth its weight in gold!!

I applaud you Elaine, without your books I doubt I would have ventured into the wonderful world of sourdough & Foodbod Sourdough. Thank you!!”

Tracey Toner, The Lush Larder

“In my opinion, each book offers its own uniqueness. Yes, some basics are repeated which allows one to create successful sourdough makes without having to own all three books. However, if you want a complete understanding of all the ins and outs of just how flexible and simple sourdough baking can be, the three books are worth their weight in gold. Simply put, all future gifting to family and friends whom I have introduced to the world of sourdough will now receive all three. If your budget only allows for one book, I suggest The Whisperer.

Think of the books as classes – The Whisperer an Introduction or basic level course and the other two releases as building blocks.

I hope this helps those who are unsure of what to purchase.”

Mary Spurrier, home baker

Sticky doughs…

Let’s talk about sticky dough…my top tips:

🌟 if your dough is soft and sticky BEFORE the overnight prove, you probably need less water in your standard dough, or it’s due to the flour/s you’re using (more below);

🌟 if your dough is soft and sticky and impossible to handle AFTER the overnight prove, it’s probably over proved and you need less starter in the dough from the start next time….🌟

Some flours will produce stickier doughs as a standard, for example, an inclusion of a portion of rye flour, malted flour or einkorn flour in your dough will make it stickier, and that’s normal, just go with it and use a bowl scraper to work with the dough if necessary. I have lots of info and tips about these flours, and more, and how they feel and handle in doughs coming in my book. The key in this instance, is not to be concerned.

The time to worry about your dough is when it’s impossible to work with, but that’s all fixable, check out the FAQ page on my site for more help. In the end, all that matters is how the dough bakes; if your loaves are fab, don’t worry about how the dough looks/feels/behaves, just keep doing what you’re doing!

Note: if your dough has over proved it may look bubbly and exuberant like the one in the photo and/or may be impossible to handle and shape, in this case, use it to make focaccia 🌟🌟🌟 method in the recipe index on my site…ps this dough was fine, it’s just a flour that likes to bubble 🤩🤩

It’s not all about looks…

I thought that I would share again some information about starters that I’ve shared before in case you missed it, are new to sourdough, or to me, or in case there’s some useful reminders…apologies for the repeated info if you’ve seen it before, but I think they’re points worth repeating…

🌟🌟

Starters do NOT need to look a certain way. Not all starters will be bubbly and vivacious, because not all flours produce that. And it doesn’t matter. Focus on growth and how they bounce back after stirring them. Look for life and activity, not appearance.

🌟🌟

Your starter does NOT need to look like mine, and there’s no reason it should. You’re using different flour, different water, and you live in a different place, it all makes a difference to your starter. So don’t compare; if your starter looks and behaves totally different from mine but it WORKS and makes bread that you love, it’s a happy working starter!

🌟🌟

Here’s a rule of thumb for you: if your dough grows, your starter is fine, it’s working perfectly. (If your dough is struggling in the cold, that’s another story, but it’s not about your starter.)

🌟🌟

If yours is a new starter, new starters do not need to be a certain age before being used, they just need to be ready. That might be 5 days or 5 weeks, there is no fixed single answer here. They are all individual, just like their makers. For everyone who’s ever asked me when theirs will be ready to use, the simple answer is: it will be ready when it’s ready, its all part of the joy of sourdough. That time, that waiting and nurturing, and it’s all so worth it. And as your start to use it and work with it, it will gain strength with every use. It’s a win:win! The more sourdough you make, the more strength you build in your starter.

🌟🌟

So please, don’t focus on how your starter looks, focus on how it behaves.

Making sourdough post lockdown…

If you began making sourdough during lockdown and are wondering how it fits in with life as restrictions lift, this post is for you….

🌟

Your starter can sit in the fridge unused for weeks at a time, it does not need to be fed or used unless you’re going to use to it.

🌟

If you make sourdough once a week, your starter will be fine; I only use my starter once a week.

🌟

Batch baking is a great way to remain stocked with sourdough; I always make sourdough in batches.

🌟

Sourdough freezes perfectly; I batch bake and always have stocks in my freezer.

🌟

Sourdough defrosts perfectly; to defrost, place your loaf, or rolls, or whatever you made, uncovered on a wire rack until defrosted. They defrost as crusty as they bake.

🌟

Change up your making and baking timetable to fit in with life and work.

🌟

Find a selection of baking timetables on my site, there is a link from my main page, and others in my book. I also have same day recipes and timetables in my book you might find useful.

🌟

Happy baking!

Cherie’s review of me and my book…

As you read this review, I invite you to imagine Cherie’s wonderful Northern Irish accent as you read her words…she makes everything sound wonderful as she speaks…

Cherie says:

“I tried making a sourdough starter seven times and seven times I threw it out.

The more I tried to get it right, the more frustrated I became when it went badly wrong. I tried the “organic apple skin in the starter to bring in the wild yeasts” method; I tried the “organic grapes in the starter” method; and I tried the “very expensive spring water” method. Every single one was a disaster but then, THEN I “insta met” Elaine on Instagram (@elaine_foodbod) and my sourdough life took a wonderful turn.

I promise you it was an epiphany! The mystery, the fear, the nonsense was taken out of sourdough making for me by Elaine and it was just FANNNNTASTIC!!!!

My starter – Esther, named after my Mummy, lives in my fridge until I need her. I take her out, she warms up, gets fed, bubbles and rises and I swear she calls to me to say she’s ready. At this point I’ve made a dough with her and I’ve dried some of her on sheets so that I’ll always have her.

I love Elaine’s tip of “pour tap water, let the chlorine evaporate off overnight and use as normal”. I mean every other recipe was basically saying “use water blessed by 25 Saints at £20 a bottle”. It was a huge thing to me as I had bought so much expensive spring water in the quest for an edible loaf, beautiful looking, beautiful tasting and ready for an instagram debut.

Elaine talked me through a few hiccups along the way…basically because I could not believe things were actually working and effortlessly so.

I never tire of lifting the lid off my pot to see what’s happened in the oven…and the “baking starting in a cold oven!!!!!!” Flip me….. a revelation! I now bake sourdough bread for anyone I can!

Due to Elaine’s informative, easy to follow and great photos in her book I now mix nuts, prunes, raisins, oats, seeds, bacon & cheese into my doughs (but not all at the same time).

Filled with dried fruits

I make cinnamon buns with Elaine’s enriched starter recipe and they are beautiful. Through Elaine I “insta met” Ahren @thegarlictun…his lames are fabulous and my bread took on another new, more grownup look.

Using Elaine’s enriched sourdough recipe

Elaine and her book have taught me so much about grains, what can go into a dough, stretching and folding and MOST IMPORTANTLY relaxing into sourdough making life.

I cannot thank Elaine enough for fixing my sourdough problems she’s so calm gentle and kind. I’ve conquered sourdough, made lots of lovely different breads and made a friend. How lucky I say!

THANK YOU ELAINE XX”

Find Cherie on Instagram @cheriedenhamcooks and enjoy more of her lovely creations!

I even took my starter on holiday and baked this in an unknown oven!

Karin’s review…

“I am a professional Chef/Instructor and have been baking sourdough bread for years.

Today I put all my “old habits” aside and followed, word for word, Elaine’s Master Recipe from her new book, “Whole Grain Sourdough at Home”.

In one weekend I created three of the loveliest loaves of sourdough I have ever baked in my life. Not only were they beautiful on the outside – golden brown and sky high with beautiful little “ears”, blisters, and banneton swirls, but they tasted out of this world. Crunchy, flakey crusts with chewy and airy pockets of soft bread inside.

Thank you, Elaine!”

Chef Karin J. Davis

Sturgis, MI

My master recipe sourdough pizza…

A close up of some pizza slices on a plate

This recipe uses the dough created using my master recipe process and then using it to create the pizza of your choice; the dough can be made up of the flour/s of your choice to create different flavours & textures…

A piece of pizza is being cut into slices.

The outcome being a lovely textured, holey, tasty pizza base!

The key is how to manage and store the overnight dough ready for when you want your pizzas. I have got 2 methods below, each designed to make it simple to fit the dough in with your timings, and not the other way round!

A close up of the crust on a pizza.

Method 1.

The morning after the overnight prove, you will hopefully have a lovely big bowl of bubbly dough; if it is escaping the bowl, gently do a single set of pulls and folds, just go once round the bowl, to pull it loosely together, re-cover it, and place it in the fridge. If the dough hasn’t reached the top of the bowl already, just place it in the fridge to bring the activity to a halt until you want to use it.

When you know when you want your pizzas to be ready for, remove the dough from the fridge an hour or so beforehand and let it warm up a bit.

Cover your work surface with water, flour or olive oil, I use water.

Turn the dough out from the bowl onto your surface and cut into portions, 2, 4 or 6, depending how big you would like your pizzas to be.

Let it sit for 10 minutes.

**I use a foil lined baking tray to cook my pizzas, liberally drizzled with olive oil (I like the crust it generates when baked). However, you may prefer using semolina, polenta/corn meal, flour, whatever your choice under the dough, directly onto your baking tray or baking implement of your choice. If you’re using a pizza stone, prepare the dough on a board or tray ready to be able to move it across to your stone as you usually do.

After 10 minutes place the dough on your chosen bakeware, and start to gently use your finger tips to push the dough out into a thinner rounder shape, or shape of your choice. You will need to let it sit for a few minutes and then do it again as the dough will bounce back.

Preheat the oven to 220C fan/240 non fan/460F.

Give your dough one final push out, spread with sauce of your choice and toppings of your choice, and bake for 12-15 minutes until the base is cooked and the cheese is bubbling.

Enjoy!

A collage of four different pictures with food.

Method 2.

In the morning you will hopefully have a lovely big bowl of dough. Cover your work surface in flour, water or oil, and turn the dough out onto the surface. I use water at this point.

Prepare your baking tray, I drizzle olive oil over my foil lined tray as stated above.

Portion the dough into 2, 4 or 6 pieces.

Let it sit for 10 minutes.

Place the pieces onto your prepared baking tray and use your fingers tips to push it gently out into a round; it will want to bounce back so let it set for a while and do it again.

Once you’ve got it pushed out to the thinness and size that you want, cover the whole tray with a large plastic bag, or place cling film over the dough, and put the whole tray in the fridge.

It can now sit in there until you want to use it, I’ve let mine sit in the fridge all day in the past.

**The top 2 photos in the collage below show the dough before and after being in the fridge. As you can see, the dough continued to work in the cold – my SuperStar in action!

You can now use this dough directly from the fridge, you don’t need to let it warm up or come to room temperature, you can just add your toppings and bake.

If you’re more comfortable letting it come to room temperature before baking you can do that too.

Preheat the oven to 220C fan/240 non fan/460F, and bake for 12-15 minutes until the base is cooked and the cheese is bubbling.

Four different pictures of pizza dough and cheese.

Enjoy!

A close up of some pizza slices on a plateA close up of some pizza on top of a blue surface

Beautiful blistered base, and it tastes SOOOO good!

A piece of pizza is being cut into slices.

And a view of the cooked base…

A close up of some kind of food

I love the crust that the olive oil creates, added to the soft interior.

A pizza sitting on top of a blue plate.A close up of some pizza on top of a blue surface

I hope you like my method and find it useful, and user & life friendly. For more pizza recipes and more, check out my book, The Sourdough Whisperer.