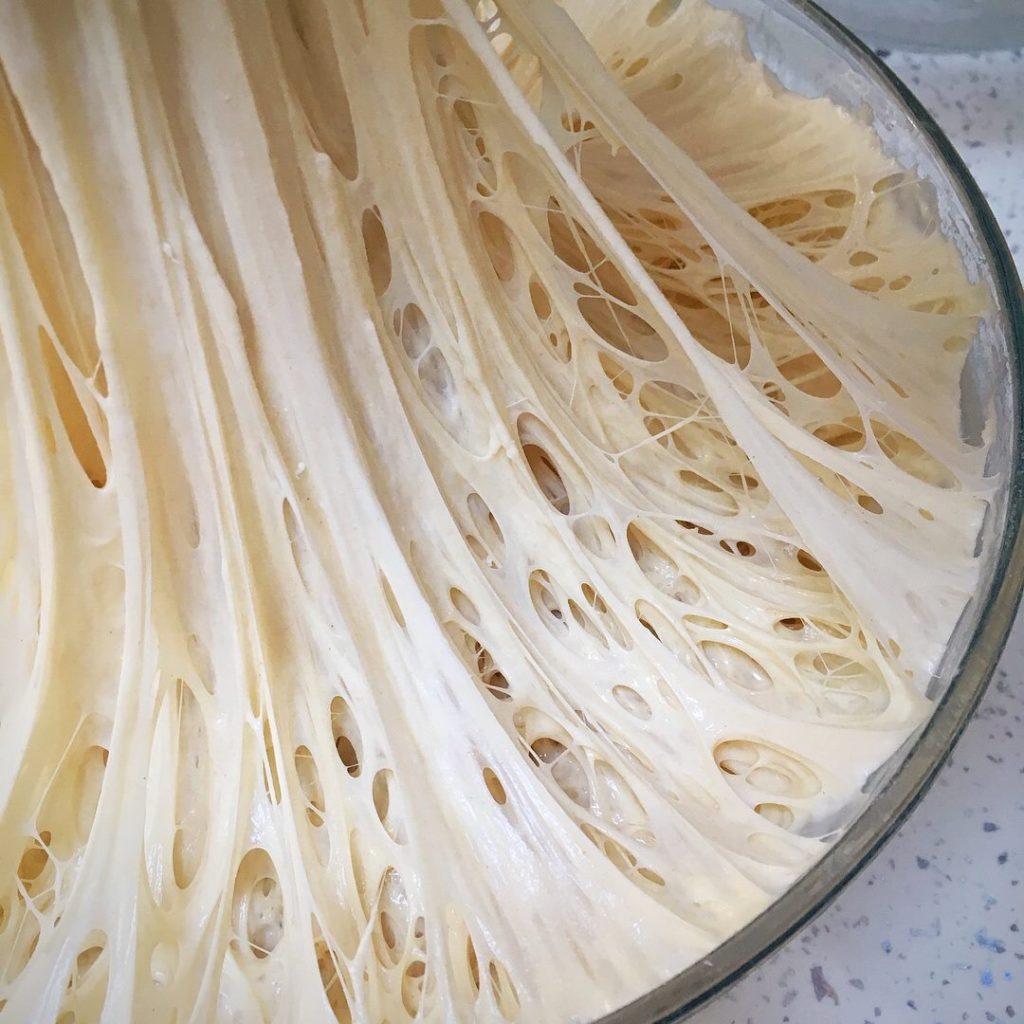
Top tips for new sourdough creators…

A bowl of rice and water on the table.

The massive surge of interest in sourdough during the lockdown has been amazing, I am literally inundated with messages and emails from dawn til dusk. A lot of them are from people asking for help as they make new starters, others are asking about how to use the various flours they’ve managed to get hold of.

If you’ve recently joined the sourdough fun and are making a starter, have made one, or are struggling getting flour, I thought I’d share some tips in case it’s useful..

*You only need small amounts of flour to make a sourdough starter.
*You can use any flour to make a starter, ideally not gluten free flour although it can be done, it will be a lot weaker.
*You don’t need to feed your starter the same flour it was made from if you’ve now run out.
*Once your starter is established, you only need to feed it to use it, daily feedings are no longer necessary.
*It doesn’t need feeding again to store it.
*Only feed your starter what it needs to generate what you need for your recipe, this way there’s no waste and you’re not using unnecessary flour.
*You don’t need to work to ratios or percentages.
*The flour you made your starter from does not need to match the flour you make your dough from.

If I can help anyone with their starter do let me know. And if you’ve got random flours and would like some ideas for using them I’m starters or doughs, let me know too.

More top tips…

Some more top tips for you and answers to the questions I am most often asked..

Give your starter time, it may look like it’s doing nothing, but it’s building strength, stick with it

If your starter is thin with tiny bubbles, add extra flour to thicken it up, it needs the extra food

If your starter has a layer of murky liquid in the top, it’s not ruined, it’s just hungry. Feed it! And make sure you are not keeping it anywhere too warm, the heat will make it constantly thin and weak

Don’t keep your starter in the oven with the light on, it’s too hot, it will work too fast and always be too thin and weak

The flour you have made your starter from does not need to match the flour in your dough

Follow the process steps and allow your dough time to do its work

Don’t leave dough on the oven overnight with the light on, it will over prove and be spoiled

Check out all of the info on my site about flour, weather, scoring, storing, the FAQs, baking times takes, there’s lots of free info there for you

Check out the equipment list, and..

If you don’t have a banneton, line a similar sized bowl with a clean tea towel and sprinkle it with rice flour

If you don’t have rice flour, grind some uncooked rice, it’s the same thing

You can use any covered oven proof pan just make sure it’s big enough

Sourdough is a wonderfully slow process, let it happen and enjoy it, it will be worth it

Watch your dough and not the clock

Give your dough time to double overnight; depending on the temperature overnight this may take shorter or longer than my usual times stated in my master recipe

If your dough is soft and spreads, use 25g less water in your dough next time

If you dough spreads when you turn it out in the pan, but bakes up to a lovely loaf, don’t worry about the spreading, enjoy your loaf

Always my biggest and most important tip:

If it tastes good IT IS GOOD!

Don’t focus on looks and holes and scoring, they don’t make it taste any better, enjoy what you’ve created, it’s amazing x x

Goats cheese and pesto sourdough waffles

A close up of some waffles on a plate

Let me introduce you to my most recent creation….it all began when I bought a waffle maker recently, possibly a huge mistake for my waistline, but so much fun to play with!

Making waffles with starter adds the lovely flavour we all adore, as well as a great texture.

A close up of some waffles on a plate
A close up of a waffle in the middle of it

I’m a savoury eater, so you could convert this easily for a sweet option but let me assure you that these are worth trying.

I used just starter, egg, goats cheese and some tomato pesto. It’s great way to use discard if you’re making a new starter, or using up some if you’ve been building up too much, or feed up your starter for the purpose then portion out what you need for the recipe.

You could also use less starter and top up the rest of the mixture with flour and water. Personally I prefer them made with all starter for the flavour.

A close up of some waffles on a plate

Ingredients

Makes 1 round/4 quarters (double the quantities for 2 rounds)

200g starter (discard, unfed, fed and active and stirred down)

OR 100g starter, as above, plus 50g flour of your choice & 50g water

1 large egg

50g crumbly goats cheese (or cheese of your choice)

25g pesto of your choice (or harissa, chilli sauce, whatever you fancy)

Method

Heat your waffle maker to maximum.

Stir all of the ingredients together well, but don’t break up the goats cheese too much. Let it sit for 10 minutes to thicken.

Once the waffle maker is ready, pour all of the mixture in (it all fitted perfectly in mine, assess how much yours needs from your own experience), close the maker and cook for 10-15 minutes or until there’s no more steam coming from your maker.

Carefully ease the cooked waffles from the maker, cut into quarters and serve.

A close up of some waffles on a plate

Tuck in as soon as cool enough to hold!

If you don’t have a waffle maker, maybe add a little extra flour and try these as pancakes or flatbreads?

My waffle maker is made by Netta and I ordered it on amazon.

A guide to making sourdough pancakes…

A close up of some food on the pan

Making pancakes with sourdough starter is simple, fast and oh so satisfying! It’s also a perfect way to use up discard if you are making a new starter, or using up some if you’ve found that you’ve started keeping too much starter.

A close up of some food on the table
A pizza with cheese and sauce on top of it.

Alternatively, feed your starter for the purpose. Build it up so that you have 100-200g of starter then mix it with milk of your choice, and an egg or egg replacement, and, if you feel the batter needs it, extra flour. Whisk it all up together.

*If you are feeding your starter solely for making pancakes, just feed it more than normal to create what you need. If you’re using discard it doesn’t need feeding or any additional attention, just use it as it is.

*As a guide, I whisk 150-200g starter with 1 egg and then enough milk to make the batter I want, depending on whether I’m making crepes or scotch/American pancakes. Thinner for crepes, thicker for the smaller thicker pancakes.

*You can use any type of starter and any type of flour to make your pancakes, I use whatever takes my fancy, hence the different colours of mine shown here.

*Make the batter as thin or thick as you usually would for pancakes.

*Let it sit until you’re ready to use it, or use immediately. If you’re going to let it sit, maybe for 1-2 hours, it will ferment a little and develop some more flavour, just cover the bowl until you’re ready to use it. It can sit at room temp. I usually use mine immediately.

*Heat a large pan over a medium heat and melt some butter in the pan. Spoon in a ladle full of batter and cook until ready, turning halfway once the base has browned.

*Eat the pancakes with your choice of sweet or savoury fillings.

A close up of some food on the pan
A process of making pizza with different toppings.
I used 2 of my sourdough pancakes to make quesadillas, I filled 2 with a homemade chilli sauce and grated cheese and melted them together
A plate of food that is on the table.
Tasty sourdough quesadillas

Bee pollen sourdough…

A cake that is being cut into it.

I was very lucky recently to be sent some bee pollen by one of my very kind Instagram followers. I’ve had bee pollen before, but not like this, this one is a vibrant yellow with lovely fat granules. Sourdough loves bee pollen, it loves the natural wild yeast and sugars that it brings to the party.

For this loaf I played with a new starter adding bee pollen to it from the beginning, and you’ll see from the photos in the grid below that it went a bit wild! It was very exciting to wake up to. Once I’d stirred it down and fed it again the next morning, it was still active and bubbly and ready to use within an hour.

This is what I used to make this loaf, however, you do NOT need to make a new starter yourself. If you would like to see how much starters like bee pollen, feed up your starter, split some out into a new bowl and feed it for a couple of days with your usual flour and water and a good amount of bee pollen before giving it a go. Or if you fancy making a new starter with some, then go for it! I didn’t measure out the bee pollen, I used a dessert sized spoon amount each time I added some.

To make my loaf, I used my master recipe, exactly as it is (link on the left of your screen) with this bee pollen boosted starter. You can also add the bee pollen to your dough instead.

A close up of some food in a bowl

For this loaf I used my 28cm long oval banneton and baked in my 30cm long oval pan from a cold start for 55 minutes. It’s all in my recipe 👍🏻

A piece of bread with some kind of crust

And this was inside the cut loaf. You can see the yellow tint from the bee pollen. Although bee pollen is sweet it does not make your loaf sweet using this small amount, but it does make the sourness more mild, and really produces a great texture, really fabulously chewy! It was a lovely loaf to eat.

A baked dish with some type of crust on it

If you do try it, I hope you like it!

A piece of bread with many holes in it.

My sourdough spelt banana bread…

Introducing my sourdough banana spelt bread…I used white spelt flour in this loaf, feel free to substitute it for any flour/s of your choice. I’ve used all and any flour to make this recipe, it works whatever you choose to use. Try it with a mix of white and wholewheat/wholegrain spelt flours, a portion of rye flour, any ancient grain flours, they all work.

The starter adds flavour and texture but not lift in this recipe as it is an immediate recipe. It’s great freshly baked but also good later and the next day once the flavours have developed.

As is my choice, I used a small amount of honey in my loaf. If you would prefer something sweeter please feel free to double it or replace it with 100-150g of your choice of sugar. You could also add chopped nuts, chocolate chips, raisins, whatever you fancy.

Ingredients

200g white spelt flour (I use this one)

100g bubbly active starter

50g runny honey

50g softened butter

1tsp bicarbonate of soda

1/2tsp baking powder

1 egg

3 medium/2 large ripe bananas, roughly mashed

An extra banana if you want one for decoration, sliced

Method

Either grease or line a 2lb/900g, 23 x 13cm/9″ x 5″ loaf tin

Mix all of the ingredients together well, but not over mixed, spoon the mixture into the loaf tin.

Place into your cold oven, turn it up to 160C/320F fan/convection, 180C/360F non fan/convention and bake for 50-60 minutes or until a metal skewer comes out clean.

Eat!

My hazelnut cacao chocolate chip sourdough muffins..

A close up of some chocolate muffins in paper cups

Introducing my hazelnut cacao choc chip sourdough muffins!

A close up of some chocolate muffins in paper wrappers

I recently whizzed up some hazelnut cacao butter by blending roasted peeled chopped hazelnuts with cacao powder, a squeeze of honey and a little rapeseed oil.

A grinder with some kind of food on it

I only added a small amount of honey to take the edge off the bitter cacao powder as I don’t like overly sweet things, but it can easily be made sweeter for other tastes. You can also use cocoa powder instead of cacao.

I ended up with quite a lot of it so I thought I’d play with some. Consequently these muffins are packed with it!!

A muffin sitting on top of a table.

Healthy, protein packed, sourdough beauties!

This is what I mixed up:

50g active starter

300g hazelnut cacao butter

200g oat milk

200g plain flour

2 teaspoons baking powder

2 eggs

I added a handful of chocolate chips to half of them.

I made half of them without the choc chips or added sugar, for me to test some, but you might prefer things sweeter than I do so feel free to add sugar or honey to the mixture.

A muffin sitting on top of a paper wrapper.

I mixed the ingredients all together well but careful to not over mix it.

Spooned the mixture into 12 muffins liners.

Baked at 200C fan/220C non fan for around 18 mins until a sharp knife came out clean.

They came out with lovely crunchy tops and soft interiors. For me, they tasted better later and the next day once cooled and the flavours had developed. The sponge stayed soft and lovely even the day after that. I was definitely happy with these.

A close up of some chocolate muffins in paper cupsA close up of some chocolate muffins in paperA person holding a bite of chocolate muffin.

Look at that light fluffy sponge! So lovely!

Feel free to substitute the oat milk for milk of your choice, plain flour for white spelt flour or all purpose flour, and my hazelnut cacao butter with hazelnut cocoa butter or hazelnut for a really sweet hit! You could also increase the amount of starter for more of a sourdough flavour, and reduce the amount of flour and milk. Have a play!

Happy Baking!!!

My sourdough cheese soufflés….

A close up of some baked dessert in white dishes

This idea has been floating round my brain for a while now and this week I finally tested it out and this was the outcome….beautiful airy cheese soufflés, rich from the eggs and with the flavour of cheese, but with the added tang of sourdough. SOOOOOO a good! Tasty, light, textured, perfect morsels. For me, a total winner!

As this was pure experiment – let me clarify, I have never ever made any form of soufflé, sourdough or otherwise before this – I only made a small amount of batter so feel free to increase it. This made 4 small soufflés, in 8cm (internal) diameter pots.

The idea came from thinking about the light bubbly airy nature of sourdough starter mixed with the light airy nature of a soufflé. In my mind it made perfect sense! And luckily the result was fabulous, even if I say so myself! I immediately ate 3 just to be totally sure 😆😆😆😆

A small bowl of food on top of a table.

Small but perfectly formed and so very tasty!!!!!

It was so exciting to watch them cook as they grew very quickly, and very well! I was dancing round my kitchen in excitement.

A close up of some food in bowls

I am so happy with the outcome, I hope you love them too if you try them. I know they could have risen more evenly, I know they’re not ‘perfect’ in the world of soufflés, but I don’t care! It worked and they taste so good, to me they’re perfectly beautiful sourdough cheese soufflé babies!

Here’s what I did…

Ingredients

100g bubbly active starter

100g whole/full fat milk

100g grated medium/mature cheddar (depending just how much you love cheese!)

2 eggs, separated into yolks and whites

Butter to grease the pots

Ground almonds, 4 tablespoons (use finely grated Parmesan or breadcrumbs for a different finish)

A bowl of food on top of a blue plate.

Method

Preheat the oven to 180C/360F fan assisted/convection or 200C/390F non fan/non convection, and place an oven tray inside to preheat.

Grease your ramekins, or small ceramic pots, with butter, then sprinkle ground almonds/almond flour into each pot and tap it around to create a layer inside each pot, covering the base and up the sides.

In a medium bowl, make the batter by adding the starter, milk, egg yolks and cheese. Stir it all together well.

In another clean bowl, whisk the eggs whites until they just hold their peaks.

Gently scrape the whisked egg whites into the batter.

Using a metal spoon, gently fold the eggs whites into the batter, using a figure 8 action, or cutting and stirring round the bowl. Do this carefully to mix them in whilst protecting the air that you’ve whisked into the whites. Do not over mix. This is crucial.

Gently spoon the batter into the prepared bowls filling them evenly and to the top of the pots if possible.

‘Top hat’ each one by running a cutlery knife, or clean finger nail, around the edge of each pot, just the very tip of the knife, so that the mixture doesn’t stick. (I didn’t do this very well hence the uneven growths!)

Place the pots onto the preheated tray in the oven.

After 15 minutes turn the oven down to 160C/320F fan assisted/convection or 180C/360F non fan/non convection, and bake for another 15 minutes.

DO NOT OPEN THE OVEN UNTIL FULLY BAKED. If you do they will collapse.

Serve immediately.

They may start to collapse quickly but it’s all part of the fun!

A bowl of food with two pieces of bread on top.

Voila! My new creation! Welcome to the world sourdough cheese soufflés!

I am sharing my soufflés with everyone at the weekly Fiesta Friday link party this week – join in the fun!

Sourdough Uzbek flatbreads…

A bowl of food with some kind of hair brush

I’ve been wanting to try making ‘Lepyoshka’ Uzbek flatbreads ever since I saw my friend Sally make them and, of course, I wanted to convert them to sourdough. So this week I did!

A close up of some bread in a bowl

I purchased the stamp from this Etsy seller a few weeks ago especially; they’re so lovely, it would be easy to fill your cupboard with them!!

A pastry with a star design on it
A bowl of bread with a wooden handle.

I was very happy with my first attempt, you can just about see the pattern created by the special stamp, but moreover, with the addition of yoghurt in the dough they tasted great. They were lovely immediately from the oven, still good a few hours later, and then again just as tasty the next day when heated up again in the toaster.

A close up of some bread on a rack
A close up of some bread with cheese

To make them I made a stiffer dough than usual by using a mix of wholemeal and white flour, plus the yoghurt in place of water. I used a 0% fat Greek yoghurt (just because that’s what I had available, I’d use full fat next time) so it added a real tang to the flavour, and an almost cheesy taste once baked.

A round pastry with a star design on it.

To use the stamp and stop it from sticking to the dough I dunked it in water for each use, then firmly pressed it into the dough and pulled directly back up and out again.

For these I used up lots of young starter, from the starters I’ve been playing with in my kitchen recently, and less yoghurt, but you don’t need to. You could use less of your established starter and more yoghurt to create the same consistency in the dough.

A close up of some bread rolls on the table

Ingredients

300g young starter

100g thick Greek yoghurt

200g strong white bread flour

50g strong wholemeal flour

20g olive oil

1tsp salt

Method

I used my usual master recipe process to create and build up the dough, then placed the bowl in the fridge overnight for it to develop, as well as to protect it from the warm night.

The next day I let the dough come back up to room temp, sprinkled the counter with water then turned the dough out onto the counter and cut it into equal(ish) portions.

I rolled these into balls, flattened them out with my fingers and pressed them into rounds.

I placed each round onto a tray lined with parchment paper and I then used a spoon to flatten out a circle in the middle into which I pressed the stamp.

I then placed them in a cold oven, turned it up to 220C fan and baked them for 17-18 minutes.

A close up of some food in a bowl

The result is a lovely soft edge with a crunchy thinner stamped middle.

I will definitely be making these again, and adding them to my courses 🙂

A baked dish on a rack with cheese.

Nut butter sourdough…

A loaf of bread is sitting in a basket.

I have been playing with adding nut butters to my doughs; I love nut butters, especially almond butter, so for me to mix of sourdough with nut butter seemed like a marriage made in heaven, and I can now report, that sourdough loves them too!

A loaf of bread with many different types of food.

This loaf was made by adding peanut butter to a portion of my starter Star. The loaf came out beautifully, it was very sour and only very slightly nutty, so next time I did things differently.

A loaf of bread in a bowl with some brown paper.

In this loaf, above, I added 100g of almond butter to the dough and again it was lovely, with a hint of nuttiness and extra sourness.

A loaf of bread with many different textures.

A loaf of bread with different colored and patterned breads.

The texture and outcome was lovely, and you can see the crumb below.

A piece of bread with many holes in it.

A loaf of bread with a cross cut out on it.

So in this loaf, above, I went further and added 200g of almond butter to my standard master recipe dough, as you can see the dough was wonderfully firm, and the colour from the nut butter spread through it.

This photo below shows just how much the dough grew with the added almond butter..

A bowl of bread sitting on top of a table.

And this one shows just how lovely and firm the dough became after it’s final prove in the fridge..

A loaf of bread with some white flour on it

A close up of some bread shapes on the ground

A close up of some bread with no crust

So good! The flavour was nutty and sour and highly recommended. The loaf baked to a lovely crust, with a soft, tasty interior, packed full of the goodness from the almond butter and the extra protein.

A close up of some bread on a cutting board

The outcome of these loaves and experiments is to say…try it!

Adding nut butters to sourdough works really well. There needs to be enough to taste it if you want the nuttiness, or if you’re looking for a way to make your loaves more sour, try adding 50-100g peanut butter to your dough – it works!

Note: I use nut butters that are made from 100% of the nuts only, with no other additions. If you use nut butters with added salt you might want to reduce the amount of salt that you add to the dough.

To make your dough, use your standard process, I always use my master recipe, and add your portion of nut butter right from the start with everything else.

The dough will be sticky initially but as you work with it the stickiness will reduce and the nut butter will become incorporated.

The dough will be lovely and firm, and the oils from the nut butter will work through the dough without it getting slimy.

If you try it, let me know!

A loaf of bread with many different types of food.