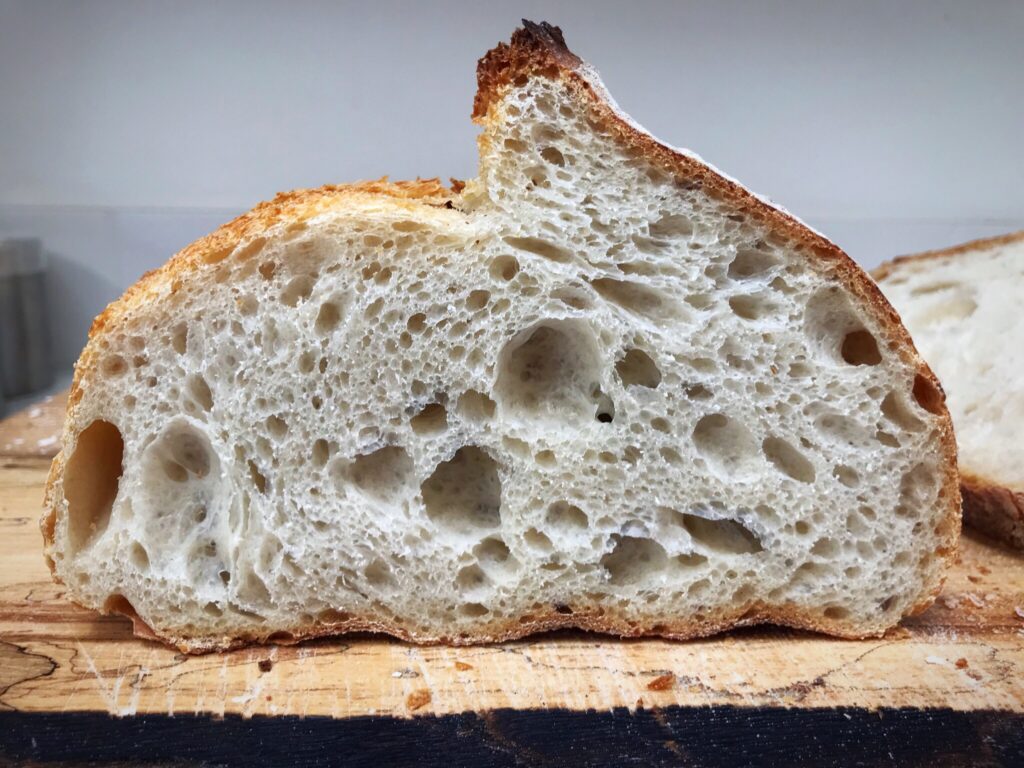
How long…?

A question I am asked daily is ‘how long…?’

This could be ‘how long will it take for my new starter to be ready to use?’ or ‘how long will it be before I can use my starter after feeding it?’ or ‘how long will it take for my dough fully proved?’, these are the main questions that come up.

There is only one answer to all of these, or any question of ‘how long…?’ when talking about sourdough which is…

I literally cannot tell you “how long”. There is no fixed, definitive answer to any of these questions.

I cannot ever tell anyone how long any of that things will take because there are too many factors involved. And understanding that and what these factors are will enhance your sourdough exponentially. Time and patience are the bedfellows of sourdough success, hand in hand with flour, temperature and environment. Which can all sound confusing and impossible to manage, but it’s truly simpler than people think, and as soon as you grasp those elements, sourdough making becomes relaxing and more enjoyable.

If I answer those earlier questions, this will give you a guide to what the main considerations are which you can the apply to your kitchen…

Question: how long will it take for my new starter to be ready to use?

Answer: honestly, it will take as long as it takes. All starters are different. Some take 5 days, some take 5 weeks, they’re all individual. It depends on the flour you use, the temperature in your kitchen, the wild yeast activity in your flour. The key is to let it happen, because it will.

Question: how long will it be before I can use my starter after feeding it?

Answer: this will all depend on the strength of your starter, and the room temperature. If it’s chilly, it will be slower; if it’s warmer, it will be faster. Watch it and it will show you when it’s ready, it will have grown and become active and lively.

Question: how long will it take for my dough fully proved?

Answer: again, this will depend on the strength of your starter, and the room temperature. If it’s chilly, it will be slower; if it’s warmer, it will be faster. This is why all of my recipes include time and temperature hand in hand for the main prove. Read my site and my book and lots of my posts on here for more info.

And one final question, that we all ask: how long do I REALLY have to wait to slice into my freshly baked loaf?

Answer: to eat it at its absolute best, at least an hour, otherwise it will be gummy, but truly, it’s totally up to you!

Time, patience, and understanding how room temperature affects sourdough making, are the keys to success. Read my other posts and hints and tips for more information.

I hope this is all helpful. My best advice is:

🌟 Make notes.

🌟 Watch your starter.

🌟 Watch your doughs.

🌟 They will tell you when they’re ready.

🌟 And most of all, enjoy the process xx

Festive enriched sourdough babka…

Take one portion of my enriched sourdough dough, add some mincemeat, roll up, cut up, plait, and bake….and create a lovely Christmas loaf! That’s what I did here…

It tastes so good!!!!! And I don’t even like mincemeat! But partnering it with this dough worked perfectly…here’s what I did…

I made a standard portion of my enriched sourdough using all white spelt flour (you can use flour/s of your choice).

This is a long slow proving dough so it wasn’t fully proved until mid morning, which was the perfect time for the next step: I turned the dough out onto the kitchen counter then stretched it out to a rectangle, matching the width to the length of my loaf pan. I then spread several tablespoons of mincemeat over the dough…

Stretched out dough covered in mincemeat

I rolled this up to a fat sausage, still matching the length of my loaf pan..

Rolled up to a fat sausage

Cut the sausage length ways to make 2 long pieces…

Cut into two

Then plaited the two pieces and lifted the whole thing into a loaf tin liner and into the loaf tin…

Plaited and placed into a liner and tin

I then covered this again with my shower cap and left it on the counter to prove again for a few hours…

And left to prove again

After a few hours the dough had puffed up…

Puffed up a few hours later
Ready to bake

I brushed the top with egg white as per my main enriched recipe, and baked it uncovered, from a cold start, at 160C fan/convection, 180C non fan/convention, for 45-50 mins. It can be baked from a cold or hot start, bake for 5 mins less in a preheated oven.

Golden baked loaf

After an agonising wait, I cut into it…

Perfect topped with cream cheese

I hope you like the look of my babka…if you don’t have, or don’t like, mincemeat, try it with jam, chutney, or any filling of your choice. And if you do make a enriched sourdough babka with my recipe, please do share it and tag me, or send me a photo of your creation…happy baking!

My enriched foodbod master recipe sourdough…

I’m so excited about this post, I’ve really enjoyed making and testing these loaves…I hope you like it too!

Every bread in this post has been made using my master recipe to create enriched doughs and loaves…they’re beautiful and shiny and they smell amazing; the texture of the bread is light, soft, not too rich, not too sweet, and with a hint of our joyful sourdough flavour…I’ve played with flours and shapes and pans, and have had great fun creating my ‘enriched master recipe sourdough’…

This loaf was made using the lighter version of the dough below, and with half strong white bread flour and half white spelt flour. Before and after shots of the bake below.
Soft and fluffy interior.
A slice of the above loaf.

The doughs are all enriched with eggs, milk, butter and honey. This is a very very tasty sourdough creation! Its great eaten on it’s own, as well as with your choice of toppings, and smells amazing all over again when toasted. And no mixer required, even better!

The end shot of the loaf above.

I have tested this several times recently and it worked perfectly with just strong white bread flour, a mix of SWBF and white spelt flour, and with 100% white spelt flour. Each version has been a success, the white spelt flour adding a silkiness to the dough that’s lovely to work with, as well as a lightness to the crumb.

This loaf was made with the richer version of the dough below and 100% white spelt flour. Once baked I brushed with it butter and sprinkled with sesame seeds.
The inside of the loaf above.

NOTES:

🌟 The added dairy products do not go bad during the overnight prove, the dough is protected by the starter.

🌟 The butter only needs to be softened, not fully melted. If you do melt it, ensure it is cool before mixing with the rest of the ingredients.

🌟 The softened butter does not need to be fully mixed through the dough initially, it will soften more and become fully incorporated as your work with the dough.

🌟 This is a heavy slow dough, allow it time to grow fully.

🌟 It’s also a dough that requires very little shaping.

🌟 It keeps well for a week if wrapped well.

🌟 I don’t like things very sweet; for us, chief taster included, the 50g honey in the recipe was perfect. If you prefer things sweeter, replace it with sugar, quantity of your choice.

🌟 I have made two slightly different versions of this, one a little richer than the other, and I like both. You can tone things down, or up, as you choose.

🌟 You can choose your own version, using the flour/s of your choice, and all or just one to two of the added ingredients. It works whichever options you choose.

🌟 For dietary alternatives, use no eggs or egg replacements/non dairy milk/no butter or a dairy free option.

🌟 I made the round loaf in my 20cm diameter enamel roaster (above) and the rectangular loaf in a large loaf tin (27cm x 17cm/10.5” x 6.5”). You can use a standard 2 lb loaf tin too.

🌟🌟🌟 My master recipe strikes again! 🌟🌟🌟

Slices of the loaf tin loaf from above.

Ingredients

50g active starter

1 whole egg + 1 egg yolk (save the white) + milk to make up a total of 350g (I use semi skimmed/half fat milk)

75g softened butter

50g runny honey

500g strong white bread flour OR 250g SWBF + 250g white spelt flour OR 500g white spelt flour

1 teaspoon of salt, or to taste

Alternative slightly lighter option:

50g active starter

1 whole egg + milk to make up a total of 350g

50g softened butter

50g runny honey

500g strong white bread flour OR 250g SWBF + 250g white spelt flour OR 500g white spelt flour

1 teaspoon of salt, or to taste

As per my master recipe (for full step by step directions click on the link to the left):

Feed your starter as normal to generate the 50g needed for the recipe.

Begin mixing the dough in the evening.

Roughly mix all of the ingredients: it will be very sticky.

After an hour, perform the first set of pulls and folds on the dough. Lifting and pulling the dough across the bowl until it starts to come into a soft ball then stop. Cover the bowl again and leave it to sit.

During this first set of pulls and folds the dough will still be sticky but keep working with it.

After an hour, perform the second set.

During this set of pulls and folds, the dough will start to become smooth and silky (esp if it’s 100% white spelt flour) and will take less actions to pull it into a ball. Cover and leave to sit.

Over the next hour or so, perform the third, and fourth set if you do one, the dough should be nice to handle now. Each time stop when the dough comes into a loose ball.

Cover and leave to prove on the counter overnight as usual.

Next morning the dough will typically have grown, but not yet doubled, allow it 2-3 more hours if it needs more time.

Line a tin with baking parchment paper or a loaf tin liner.

Pull the dough together, it does not need to be handled much, it doesn’t need to be too tight, this will be a stiff heavy dough, and place it hand side down/smooth side up into your liner.

Cover again and leave to prove on the counter again until the dough is level with the edge of the pan, typically 3-4 hours.

Mix the egg white with a tablespoon of water and brush the top of the dough gently with it.

Bake, uncovered, from a cold start at 160C fan/convection, or 180C non fan/convention oven, for 45 mins, covering if the top becomes too dark.

Remove from the oven, and the tin and allow to cool.

Enjoy!

Braided and hand shaped loaf using dough made with half strong white bread flour and half white spelt flour
Dough made with the lighter version of the above options and made with half strong white bread flour and half white spelt flour.
Slices of the inside of the baked loaf above.

To use the dough to create shaped doughs, refrigerate the dough for 1-2 hours after the overnight prove to firm it up, then turn it out, portion it and shape it as you choose before covering it again and leaving it to prove again for 3-4 hours, then bake as above.

Dough split into 6 equal pieces (by eye), shaped into balls and placed together inside the lined pan and allowed to prove again before baking. You could also bake them separately to make rolls.
The baked loaf.

🌟🌟🌟 It really is true, you can use my master recipe as a base for anything you want to create! 🌟🌟🌟

You can now find this recipe in more detail and with new variations in my new book! Happy baking!

How to score dough successfully…

From this…
To this 🙂

There are some key tips to scoring, but first, why do we do it at all?

Scoring dough has two main jobs, firstly, it allows and encourages growth in your loaf by enabling the dough to expand as it bakes. Because it will expand, but if it isn’t scored, it won’t expand as much as it would like to and it will inhibit the size of the baked loaf.

If you don’t score your dough there’s also every chance it will crack as it bakes anyway and possibly blow out at the sides, so why not encourage it to grow as you’d like it to instead?

Secondly, it allows you to choose how your loaf will look once baked.

By scoring your dough with a single slash, you will encourage a more dramatic opening (assuming a good strong dough).

Before..
And after.

By scoring a more intricate and involved design you allow the dough to grow evenly and protect the design.

Before…
And after.

So here’s my top tips…

*The blade needs to be thin and very sharp, ideally a razor blade. By using a bread lame this gives you a safe handle for your blade, but it’s not a necessity. Nice to have though, I love all of mine 🙂

*Your dough needs to be firm. This is achieved by having a dough made with the right amount of water for your flour choice, and proved well. You’ll find help with this on my FAQ page.

*If you want to give yourself a slightly firmer surface to score, place your banneton full of dough into the freezer for 30 minutes before turning it out, scoring and baking. (If your dough is too wet or over proved, it is likely to still spread even with this tip).

*A nice firm dough also allows you to take your time as it will hold its shape whilst you score. No need to super fast slash-and-get-it-into-the -oven as fast as possible!

*By not preheating your pan (which I never do) you also make this part of the process smoother as you’re not moving the dough around so much. I turn my dough out into my cold pan, take my time scoring, then into my cold oven and bake – a nice relaxed process.

*Score into the dough 0.5-1.0cm deep.

*Score firmly, but without pushing the dough down into itself.

*I always score from the outside towards the middle when unless I’m making a pattern, this way you don’t risk squashing the dough or dragging the blade.

*If your blade is dragging, try changing it for a new blade, or making sure your dough is firm enough to score.

*How you score can affect the final shape of your dough as hopefully my photos have shown. Sorry, I don’t have any bad examples to make the point!

*As always, there is no right or wrong here, and the best way to learn is via trial and error.

*Personally, I like the lines that the rice flour in the banneton leave, if you’re not a a fan, lightly brush is off.

I have various videos on my YouTube channel and Instagram showing scoring.

Here’s some ideas from my past loaves..

Before
After.
Personally I like it when designs crack and burst,
I like seeing that power in my dough!
Before
After.
Before..
After.

Have fun, and happy scoring!

Talking about dough…

Amazing, beautiful dough…I love seeing this! This is a shot of the underneath of my bowl of dough following it’s overnight prove, the dough has risen and more than doubled in size and you can see the texture all the way through the dough. It’s a joy every time I wake up to a sight like this, it never ever gets boring!

So, here are some notes to keep in mind regarding dough…

🌟 for everyone who has asked me if their starter is strong enough: if your dough is growing and doubling, your starter is fine and working well

🌟 if your dough isn’t growing, it’s either because it’s been cold, see below, or your starter needs a boost, see my site for details

🌟 all doughs are different due to different flours, different temperatures, different environments and different handling

🌟 if it’s been cold overnight and your dough hasn’t doubled, it’s normal, temperatures under 18C/64F will slow the growth down; just give it longer in the morning to do its work

🌟 under proved dough will result in a dense loaf with large uneven holes, but it will still taste good!

🌟 if it’s been warm overnight, well over 20C/70F your dough will grow and possible double and look volcanic and fabulous, however, it risks over proving and losing all structure and integrity, it will be soft and sloppy and impossible to work with

🌟 over proved dough will result in a flat dense bake, but it will also still taste good!

🌟 to combat high temps either read the baking timetable on my site or use less starter in your dough

🌟 when you handle your dough after it’s main bulk prove, it should feel bouncy and have some nice resistance

🌟 my best tip is: learn to watch your dough and not the clock; your dough well tell you what’s happening and what you need to change, if anything, and,

🌟 get to know your starter

🌟 get to know your flours and your doughs

🌟 get to know how sourdough works in YOUR home

🌟 Make notes, jot down times and temperatures, flours and behaviours and create your own reference guide.

🌟 Happy baking! 🌟

Making sourdough in hot temperatures…

Heat can be great for proving dough, but only up to a point; once temperatures start to rise up and over 20C/70F at night, our beautiful overnight doughs risk over proving.

There are simple steps to prevent this from happening…I have a timetable on here which can help; it is based on proving the dough on the counter for a few hours in the warmth, then putting the dough into your banneton and into the fridge overnight; the dough can then be baked directly from the fridge any time the next day.

Or, what I do, which is the simplest solution, is use my master recipe exactly as it is, just with less starter. The photos shows 20g of my lovely active starter, which pretty much equates to a tablespoon which is all you may need as the heat rises, in fact, you can use even less than that if you need to, I’ve used as little as 5g of starter in my dough and it’s worked perfectly. You do not need to change anything else about the recipe, just this.

The key thing to keep in mind is that you always always have full control over your dough making, many bakers think that the dough controls them, and that they need to jump to its tune, whereas the truth is actually the other way round. We have full control. You’ll find all about this and a whole section about dough in my book, The Sourdough Whisperer.

TOP TIPS:

🌟 less starter slows the dough down and allows you to still be able to prove your dough on the counter overnight. It works perfectly for foodbod sourdough bakers all over the world who live and make sourdough in hot countries all year round.

🌟 a thermometer in your kitchen will help you to be able to plan for when you need to do this but already around the Northern Hemisphere temperatures are rising and doughs are being challenged. If this is happening to you, use less starter.

🌟 you will know if your dough is over proving if it grows very quickly and is overly bubbly.

🌟 you will know if you dough HAS over proved if it fills your bowl, is very slack and fluid, very bubbly, impossible to handle and smells strongly.

🌟 this dough will no longer have any structure and will not be able to hold its shape. It will bake to a flat, dense, but tasty loaf.

🌟 the best thing to do with over proved dough is use it to make focaccia or flatbreads, something that doesn’t require structure.

Happy baking 🌟🌟🌟🌟

Please note: this does not work the other way round. If you are heading into cold weather, more starter is not the answer. If it’s cold it’s cold, dough will respond slower however much starter you use. In this instance just allow your dough more time to do it work. There’s full info and hints and tips on my site to help you.

Making multiple doughs and loaves…

🌟 if you want to double or triple my master recipe, feed your starter double or triple the usual amounts to generate the amount of active starter you’ll need to make your doughs.

🌟 you don’t need to start out with more starter for it to be able make more; just feed your usual base amount for the job, it will work perfectly.

🌟 if you want to double or triple my master recipe, just double or triple all of the quantities.

🌟 I always use one bowl per dough when I make multiples rather than one large single dough in one bowl. The main reason for this is that when I prove my dough overnight it grows and fills the entire bowl, so I would need an absolutely huge bowl to hold a double or triple batch of dough.

🌟 I also use one bowl per dough as I like to know that I’ve fully mixed and incorporated all of the ingredients well. So whether I make 2, 3 (or 4, as I was in the pic), doughs, I use 1 bowl per dough. It’s also a lot easier than trying to split the dough further down the line.

Plus a huge batch of dough would become quite difficult to manage!

🌟 if you do make a single bigger dough and therefore one huge loaf, you will indeed need to bake it for longer.

🌟🌟🌟 Happy Baking 🌟🌟🌟

Spiced spinach sesame seed sourdough flatbreads…

My flatbreads served with a plate full of leftover roast vegetables, ajvar, zaatar and tahini

I do like a ‘chuck it all in a bowl and see what happens’ kind of creation, which is what these were…I’ve made many spinach flatbreads in the past, but this was the first time adding some starter. It adds an extra flavour and of course, all that sourdough goodness we love!

These are also packed with great healthy ingredients and are a great way to get kids eating spinach! You can use them as flatbreads or make bigger rounds and use them as a pizza base.

Equally great the next day, the flavours continued to develop

This recipe can serve as a basis for something you might fancy making, you can swap out the ingredients for things of your choice or just follow it as it is. I’ve included the spices I used, feel free to swap these for your favourites, an Indian inspired spice mix works well too.

Ingredients

200g starter (this can be discarded starter, unfed, or fed for the purpose)

250g baby spinach leaves

150g flour of your choice, I used buckwheat flour

50g toasted sesame seeds

3 tablespoons tahini or olive oil

3 garlic cloves, peeled

2 teaspoons tabil spice mix (toasted even amounts of coriander, cumin and carraway seeds, ground)

2 teaspoons pul biber chilli flakes

2 teaspoons paprika

Salt and pepper to taste

All in the bowl

Method

In a blender whizz up the everything expect the sesame seeds, starter and flour. Run it until the spinach and garlic are finally chopped.

Scoop it all into a mixing bowl, stir in the seeds, then fold in the starter and flour.

Cover the bowl and leave the dough to settle and develop.

Now you can leave the dough for an hour, or several or overnight. The longer you leave it the more the flavour will develop, it may even prove and little and puff up.

When you want to cook your flatbreads, heat your oven to 180C fan/200C non fan.

Turn the dough out onto a floured surface and break off portions. Shape them into round then flatten them out to 1/2cm thick.

Place them onto a oven tray. Either bake immediately or cover and allow them to prove again for an hour before baking.

The uncooked dough is such a great colour and smells amazing

Bake for 10-15 minutes until slightly puffed and darker in colour.

Eat warm or store for later, they’re even better after 2-3 days, and can easily be reheated in a toaster.

Enjoy!

I hope you like them!

Sourdough Uzbek flatbreads…

A bowl of food with some kind of hair brush

I’ve been wanting to try making ‘Lepyoshka’ Uzbek flatbreads ever since I saw my friend Sally make them and, of course, I wanted to convert them to sourdough. So this week I did!

A close up of some bread in a bowl

I purchased the stamp from this Etsy seller a few weeks ago especially; they’re so lovely, it would be easy to fill your cupboard with them!!

A pastry with a star design on it
A bowl of bread with a wooden handle.

I was very happy with my first attempt, you can just about see the pattern created by the special stamp, but moreover, with the addition of yoghurt in the dough they tasted great. They were lovely immediately from the oven, still good a few hours later, and then again just as tasty the next day when heated up again in the toaster.

A close up of some bread on a rack
A close up of some bread with cheese

To make them I made a stiffer dough than usual by using a mix of wholemeal and white flour, plus the yoghurt in place of water. I used a 0% fat Greek yoghurt (just because that’s what I had available, I’d use full fat next time) so it added a real tang to the flavour, and an almost cheesy taste once baked.

A round pastry with a star design on it.

To use the stamp and stop it from sticking to the dough I dunked it in water for each use, then firmly pressed it into the dough and pulled directly back up and out again.

For these I used up lots of young starter, from the starters I’ve been playing with in my kitchen recently, and less yoghurt, but you don’t need to. You could use less of your established starter and more yoghurt to create the same consistency in the dough.

A close up of some bread rolls on the table

Ingredients

300g young starter

100g thick Greek yoghurt

200g strong white bread flour

50g strong wholemeal flour

20g olive oil

1tsp salt

Method

I used my usual master recipe process to create and build up the dough, then placed the bowl in the fridge overnight for it to develop, as well as to protect it from the warm night.

The next day I let the dough come back up to room temp, sprinkled the counter with water then turned the dough out onto the counter and cut it into equal(ish) portions.

I rolled these into balls, flattened them out with my fingers and pressed them into rounds.

I placed each round onto a tray lined with parchment paper and I then used a spoon to flatten out a circle in the middle into which I pressed the stamp.

I then placed them in a cold oven, turned it up to 220C fan and baked them for 17-18 minutes.

A close up of some food in a bowl

The result is a lovely soft edge with a crunchy thinner stamped middle.

I will definitely be making these again, and adding them to my courses 🙂

A baked dish on a rack with cheese.